Instructions for Submitting Posters and Demonstrations
Posters are ideal for reporting on emerging issues and on works in progress. Demonstrations provide an opportunity to highlight and share innovative solutions. Both require an extended abstract of up to 2 pages that clearly describes the topic to be presented and states its unique contribution to the field. Posters and demonstrations should aim to improve knowledge, show new technical capabilities, or share solutions and experience in the field.
- Template: For all submissions authors have to use the iPRES 2019 templates
- Submission format: Save submission to format of the template.
- Submission upload: Upload your submission in pdf-format to Easy Chair. During the EasyChair submission process, the following selections must be made:
- Type of submission: Select Poster or Demonstration
- Conference Theme(s) Addressed: Choose one or more relevant terms from the Call for Contributions:
- Collaboration: a Necessity, an Opportunity or a Luxury?
- Designing and Delivering Sustainable Digital Preservation
- Exploring New Horizons
- Building Capacity, Capability and Community
- The Cutting Edge: Technical Infrastructure and Implementation
- Further Instructions: Follow the instructions given in the template to make sure all relevant information is available for the review process.
For Demonstrations only:
- Required infrastructure and/or resources: Indicate the materials required in order to run the demonstration (e.g., PC, projector, audio, WiFi, etc).
- Duration: Indicate the length of the demonstration.
- Goals: Explain 2 or 3 of the central goals of the demo (e.g. improve knowledge about the domain, show the new technical possibilities for accessing data, search for solutions through discussion and sharing of experiences, etc.).
Poster Instructions
This year, iPRES will again feature digital-only posters for the Posters and Demonstrations session. These ePosters will be displayed on monitors during the Posters and Demonstrations session on Wednesday 18th September, 11:00 – 12:30. There will be an award for Best Poster that will be presented at the conference dinner on Wednesday evening.
Finalized ePoster files must be sent to the iPRES Organizing Team NO LATER THAN Friday, September 6. More information on how to submit your ePoster files will be provided via email. We do recommend that you also bring a backup copy of your ePoster files with you to the conference on a flash drive. Posters will be licensed with an Attribution-NonCommercial 4.0 International license (CC BY-NC 4.0).
ePoster Templates and Guidance
Here you can find Powerpoint Templates for creating ePosters:
Simple Template
Multiple Slides Template
Hyperlink Slides Template
| Screen dimensions | |
| Screen Size | Height – 22.04” Width – 40.97” |
| Screen Specifications | Samsung 55” LED/LCD monitors 16:9 Widescreen |
| Portrait or Landscape | |
| We will only be accepting landscape presentations. If your presentation is in a portrait format, it will be forced as landscape and will be distorted. | |
| Presentation software | |
| All of the electronic posters should be created using our landscape PowerPoint templates. | |
| Average number of pages in an e-poster | |
| On average, presenters will normally have 2-4 pages of content on their e-posters. Additional pages can be used for hyperlinked (enlarged) images, rotating graphics or for videos. | |
| File size | |
| We suggest limiting your e-poster file size to 150 MBs or less. | |
| Saving the presentation | |
| Each poster/demo will have an ID number, provided by the iPRES 2019 Posters and Demonstration Chairs on acceptance. The recommended naming convention for files is: Poster/Demo ID Number-Surname-Title (P465-Ras-DigiPresRocks). This ID number will also be labelled on your digital display board at the conference for easy finding. Be sure to select the “include fonts” option when saving in Powerpoint (File -> Options -> Save -> Include fonts). | |
Video
Please note that there will be no “Minute Madness” session this year. This is replaced by a short video, on display on several screens during all conference days. The authors of accepted posters and demonstrations will have to create a short video, with a maximum length of up to 60 seconds. These videos can consist of interviews, other video footage, animations, slides or photos. You will need software to be able to create a video. A few examples will be mentioned below. Video files must be sent to the iPRES Organizing Team NO LATER THAN Friday, August 30.
Video Specifications
Please keep in mind that the videos will be played silently during the conference. As a result your video should contain subtitling in case you use a voiceover or interview. Our suggestion: Think upfront of a creative way to tell your story without dialogue! Online, visitors can check your video contribution with sound.
Videos will have to meet the following specifications:
| File type | .mp4 or .mov |
| Video format | H264 (YouTube – preset if applicable)) |
| Video size | 1920 (width) x 1080 (height) |
| Captions / subtitling | Burnt in |
| TV standard | PAL |
| Frame rate | 25 fps |
| Bitrate | Max. 12 Mbps |
Creating Animations
In animation you can combine icons, pictures and text to tell your story. If you’re used to working with PowerPoint or Prezi, you’re already halfway there.
Software
There are a lot of tools for creating presentations or animations available online. Not all of them are able to export the presentation as a compatible video however. You will have to check this upfront! Some of them can only be played online… The easiest way (because most people are already familiar with it) is the use of Prezi or PowerPoint.
Prezi:
If you want to use Prezi, you need screen recording software like Camtasia (Windows) or Quicktime (Mac) in order to create a movie from your presentation. You will have to run your Prezi, and simultaneously record your screen.
PowerPoint:
You can export a PowerPoint presentation directly as a movie. Even the animations you make within a slide will be recorded. Just go to “File-Export-Create a Video”. You can decide here how long every slide lasts. You have to make sure that your presentation is designed in widescreen (16:9) mode in order to create a compatible movie.
Creating Video
You can also decide to tell your story with video material. This might be an interview or more specific shots about your project. Keep in mind that you will (most probably) need a text overlay to get the message through.
If you use your Smartphone for recording video, the easiest way to edit your video is with a smartphone App. Make sure to use an App that is able to work with multiple “layers”, since you will need to add text or subtitling. There are a lot of options online, like Adobe Premiere Clip (Android and iOS), IMovie (iOS) or FilmoraGo (Android).
If you use a video camera, you will need video-editing software on a PC.
Recording interviews
2:3 rule
Keep the eyes of the person filmed at about 2/3 from the bottom of the screen. Avoid centering the subject in the center horizontally: 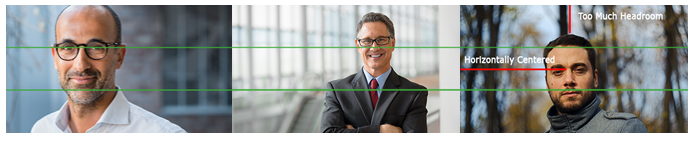
Check the background
Try to create space behind the subject, this creates depth and focus. Standing close to a wall can cause ugly shadows. Avoid distracting backgrounds.
Avoid hard-cuts
If you have to make cuts in an interview, you need extra video footage to cover-up the cuts. This prevents “jumps” of the image. There are two easy solutions:
- Record the same interview with 2 cameras (1 close, 1 further away), so you can switch between cameras on the cuts
- Record b-roll. (Extra video material that emphasizes the story told).
Light
Prevent shooting video in low-light situations, because it will cause noisy images. Make sure the face of the subject catches enough light comparing to the background.
Sound
Record interviews at a (relatively) silent location. Avoid distracting noises on the background, like air conditioners, telephones, footsteps or doors slamming.
If your camera is farther than 2 meters from the subject, the quality drops quickly. So: film close or use a clip-on microphone.
Add Subtitling
Keep in mind that the videos will be played silently during the conference. As a result your video should contain subtitling in case you use a voiceover or interview.
In most video-editing software you can add text-layers, so you can add your own subtitling here. Make sure the subtitles are “burnt-in” into the video, and that they are readable.
If your software does not support this option, you can send us the movie with the subtitles as a Word document. Please contact Tjaart Venema, contact@fixvision.nl.